Samba Server Configuration - act 1
Samba(server access message block) is a program and protocol that is designed to allow files and folders to be shared between Windows and a Linux operating system. Samba communicates with window's SMB/CIFS network protocol when it tries to tell windows that a shared resource on Linux can be accessed from the network. Once windows "sees" that shared resource, it can be accessed from the file manager.
Samba is actually simple to setup provided there are well written documentations, great configuration examples and, LOTS of patients. There are two types of interfaces that can be used to setup Samba on Linux, using the shell/terminal or a web-based UI. This article will be demonstrating the setup using a shell or terminal.
Samba is actually simple to setup provided there are well written documentations, great configuration examples and, LOTS of patients. There are two types of interfaces that can be used to setup Samba on Linux, using the shell/terminal or a web-based UI. This article will be demonstrating the setup using a shell or terminal.
As of this writing, the samba version in use is the 4.6 version installed on CentOS 7 32bit using a 3.x version kernel.
First things first, samba and all required files must be installed.
sudo yum -y install samba
sudo yum -y install samba
sudo yum -y install samba-client
sudo yum -y install samba-common
sudo yum -y install cifs-utils
Included programs with the above installs are the background services "smb" and "nmb".
Included programs with the above installs are the background services "smb" and "nmb".
smb(SMB/CIFS server) - is the server daemon, running in the background of a linux system, that creates a path "sort of speak" for windows to access file shares and printers on a linux system. This is how windows can access any network shares created on a Linux machine. smb is the service that talks to the SMB/CIFS protocols on windows.
nmb(netbios name server) - a server daemon that helps convert server names to IP addresses. If a windows system wants to contact a Linux server by using its hostname, then nmb will take that hostname and find the IP number associated with it.
Once the required tools are installed, make sure the server network services "smb" and "nmb" are enabled and running.
sudo systemctl enable smb
sudo systemctl start smb
sudo systemctl enable nmb
sudo systemctl start nmb
Now it's time to create the network shares. To do this, we will use a complex but powerful weapon known as the "smb.conf" configuration file.
sudo systemctl enable smb
sudo systemctl start smb
sudo systemctl enable nmb
sudo systemctl start nmb
Now it's time to create the network shares. To do this, we will use a complex but powerful weapon known as the "smb.conf" configuration file.
The "smb.conf" config file, is located in the "/etc/samba" folder on the linux machine. It is the tool used to create the actual shares. This file does not cut corners. If time is not taken in learning how to wield this weapon, it will be useless and could actually pose a threat in an enterprise-level network environment. Luckily, there are good documentations and a sample file that can be used for reference.
The sample file is located in the same folder as "smb.conf" and is named "smb.example.conf". This file gives the admin a picture view of what the "smb.conf" file could look like when it is servicing shares with brief explanations of the settings. Nothing can take the place of a manual; ok, maybe a video tutorial. Samba has an in-depth manual that really dissects samba. The admin can access this manual by simply typing "man samba" in a terminal or shell screen. To find more documentation associated with samba, type "apropos samba".
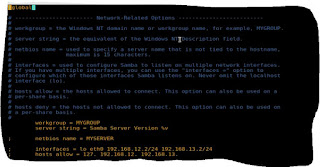
Here is a small look at what the smb.example.conf could look like depending on the linux distribution in use.
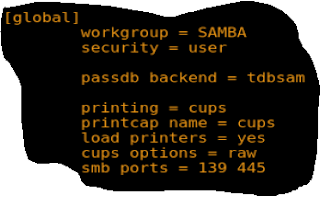
Let me give an example of a share I created. The global field manipulates the behavior of samba as well as establishing security measures and a "workgroup" name. The workgroup will be "SAMBA", samba will require a username and password to access the share as indicated by "security = user". The user name will be stored in the "tdbsam" database as mentioned by "passdb backend" this is default. Printing services will be deployed, if you have printers. If not, you can simply remove these settings. The ports that smb will listen on can be stated in this file as well but samba will set these ports on its own.
If the parameter “security = user” is set, then a samba user must be created. Create a samba user by using a login name already available on the system. The program we will use is the "smbpasswd" program which works similar to the "passwd" program.
#smbpasswd -a username
Now lets create a share for the server to serve. I placed the share parameters at the bottom of the smb.conf file. The shared folder is located in the root directory as indicated by "path = /sambashare" and I gave that directory read,write and execute permissions. Permissions like that can be set in the smb.conf file, however, if the folder itself restricts certain permissions, then smb.conf can do little to change them. If "system-level" access permissions are not established for a share, then you may run into issues when attempting to access or places resources in it from the network.
From the shell screen.
sudo chmod -R ugo+rwX /sambashare
This means, give the owner, the group the owner is part of, and others, read, write permissions on files in the folder and execute permission on the folder and folders within it. Once the system permissions are set, then you can change these permission using smb.conf. For example, no guests are allowed, or as I understood it, this share can only be accessed by an authenticated user. "writable = yes" means, users can write to the folder. If set to "no", nothing can be written. "browseable = yes" mean users can read content in this folder.
It is always good to test your settings confirming no syntax errors. Samba has a tool called, "testparm" that is designed just for that. However, it did not notify me of wrong spelling. To be honest, not sure how useful it really is.
Before we start digging into the server to list and access shares, we have to be aware of any security programs that are enforcing access restrictions. RedHat/CentOS take security seriously. Unless the admin gives permission, selinux will deny access to programs it does not trust, or programs that are not vital to the operation of the system.
By default, selinux restricts samba access. Some RedHat-based systems have a firewall installed alongside selinux, for example, firewalld. Both services either must allow samba share access are should be turned off. For the sake of testing only, you can turn off both security services.
If running selinux
sudo setenforce 0
If running firewalld
sudo systemctl stop firewalld
Note: turning off selinux and firewalld will not survive a reboot. I recommend, you don't make these settings permanent. In another article, I will demonstrate how to enable these security services to allow samba access without leaving backdoors open for rats to get in.
To list the shares on the server, use the "smbclient" program.
smbclient -U (username) -L (servername or IP address)
This command will use the authorized user to list all shares that are being served on the server.
smbclient -U (username)
This command will use the authorized user to list all shares that are being served on the server.
To access a share, use the same command, but without the "-L" option. This will give an ftp like prompt where you can access the share.
smbclient -U (username) \\server\share
smbclient -U (username) \\server\share
From a windows system, try accessing the share using the file manager. On Windows 10, open the file manager, and click the "Network" icon in the left windows pane. If the Linux server name does not appear, then right click the "Network" icon and select "map network drive". In this screen, type the username you created using "smbpasswd" and the server name or the IP address. Once windows contacts the server, it will ask for the password. If all works well, as it should, you have access the samba share.
Stay tune for act - 2 as I explore how to enable selinux and firewalld to allow samba access and to auto mount this share on another RedHat-based linux OS. May the open source be with you.


Comments
Post a Comment